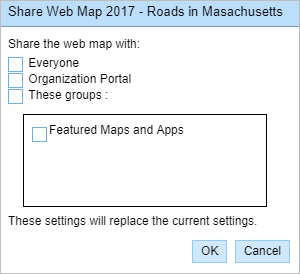
You can share a web map in Event Editor using the Share Web Map dialog box. Web maps can be shared only if Portal for ArcGIS or ArcGIS Online security is configured.
If you are not the owner of the web map, you can’t share it. In this case, first save the web map as a new web map (saving a web map can only be done if security is configured). The new saved web map can be shared with everyone (public), with your organization in Portal for ArcGIS or ArcGIS Online, or with specific groups only within Portal for ArcGIS or ArcGIS Online.
- Open Event Editor and, if prompted, sign in to the Enterprise portal or ArcGIS Online.
- Click the Map tab.
- Click the Web Map button
 .
. Hover over a web map thumbnail to view additional information, such as the web map summary, tags, and last updated date.
- Expand the My Maps folder.
- Hover over a web map thumbnail and click the Share Web Map button
 .
.The Share Web Map dialog box appears.

- Check the check box to indicate with whom you want to share your web map.
- Everyone—Publicly available to access, and by default, it will also be available in Portal for ArcGIS or ArcGIS Online.
- Organization Portal—Available to access by members of Portal for ArcGIS or ArcGIS Online only, and the web map will appear in Shared Maps on the Web Map dialog box.
- These groups—Available to access by members of specified groups only within Portal for ArcGIS or ArcGIS Online, and the web map will appear in My Groups on the Web Map dialog box.
Note:
You can return to this dialog box and uncheck the check box for those with whom you want to stop sharing the web map.
- Click OK.
Once the map is shared successfully, confirmation appears at the lower right corner of the screen.