Layers are the contents of a map. They include a wide range of information about people, the earth, and so on. Layers can be composed of imagery, features, and more. Once you sign in to the extension, create a mapboard, open it in the Compilation window, and add content, you can organize and update the layers in the map using the options described in the following sections. For example, you can modify layer visibility, access data attributes in pop-ups, change the map projection, and choose a display resolution and mapping profile for syncing layers.
Organize layers
The Contents pane displays all layers added to the map. You can expand and collapse the pane as needed by clicking the Show/Hide layers button. You can learn more about a layer by pointing to the layer's options button and clicking Item Description to go to the layer's item details page. The item details page includes a variety of information, options, and settings provided by the owner of the layer, such as a description, credits, and terms of use.
Once you add a layer to the Compilation window, you can organize your layers in any of the following ways:
- Order—To change the order of a layer, drag it to the desired position.
The layer order that is set in the table of contents will be preserved in the exported map.
- Rename—Double-click the name directly and type a new layer name.
- Set visibility—To change a layer's visibility, click the Toggles visibility button
 .
. Note:
Layers that are set as not visible in the Contents pane at the time of sync will be included in the downloaded layers in the Illustrator file (if the Toggles Sync button
 is turned on) and will be set as not visible in the Illustrator Layers panel.
 - Sort layer list—At the bottom of the Contents pane, click the Sort layers by geometry type button
 to reorganize the list of layers in the table of contents and change how they render in the map. The resulting order (from the top down) is points, lines, and polygons. This layer order ensures that polygon features don't cover line and point features in the map and that lines don't cross over points. If the button is disabled, your layers are already sorted or all your layers have the same geometry type. (Basemap layers always remain at the bottom.)
 - Hide non-drawing layers—By default, all non-drawing layers appear in the layer list. You can click the Show non-drawing layers button
 to turn off this feature and hide the disabled layers, if preferred.
 - Remove—Remove a layer from the Contents pane.
View feature attributes and add labels
To learn more about the features in your map, you can view pop-ups with associated data attributes and, optionally, label features of interest.
- In the Compilation window, on the navigation bar, click the Select features to show attributes button
 .
. - Click a feature on the map to view its data values in a pop-up.
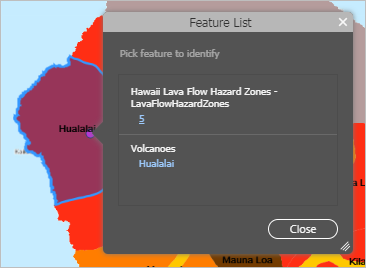
If multiple features overlap at the same location, you're prompted to choose a feature from a list of values grouped by layer. You can move the pop-up if it covers the relevant portion of the map.
- Point to each value in the feature list to highlight the corresponding feature on the map and identify the one you want.

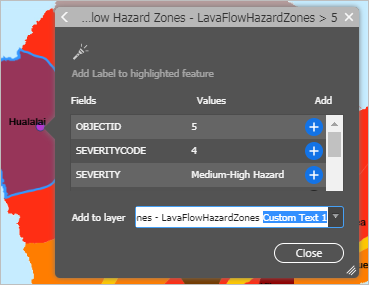
- Click a value for the respective feature to display a list of all its data values. Resize the pop-up window to see longer field values, if necessary.
Note:
You'll see field aliases instead of the field names from the data if the layer has field aliases defined.
If your map has a lot of overlapping features, click the flashlight button
 to flash the selected feature in the map to help you confirm your selection. You can click the back arrow to return to the list of other features.
You can also label the feature with its attributes. The label is added as a new text layer in your map.
- Optionally, rename the text layer or choose from an existing one if you've already labeled other features.

- Click the Add button
 next to a field value to label the feature on the map.
 - To change the label style, in the Contents pane, point to the options button for the new text layer and click Manage Labels.

Change map detail and resolution
To download higher-resolution image layers in Illustrator, you can increase the PPI (pixels per inch) value. This may result in longer sync times.
- Open the Compilation window.
- On the navigation bar, set PPI to a value within a range from 96 to 600.

- Press Enter on your keyboard.
Note:
If setting a higher PPI leads to the data not displaying, use a lower PPI so the required image layers can display.
Change the mapping profile
With the Default mapping profile, you can use vector tile basemaps directly in the extension, providing many options for themed vector maps and layers. If your current workflows still require using the VectorStreetMap or Natural Earth vector basemaps that were designed for use with the extension, use the Legacy mapping profile. It's recommended that you use vector tile basemaps from ArcGIS Living Atlas (if you have access) or customize and host your own vector tile layers.
Note:
For ArcGIS Enterprise accounts, consider the following requirements:
- To use the Default mapping profile, your organization must be configured with an ArcGIS Server preconfigured print service.
- When using the Legacy mapping profile, the layers in the map must be accessible from outside your firewall.
- The Legacy mapping profile is not available in a disconnected environment.
To change the mapping profile for the current map, complete the following steps:
- In the Compilation window, click the Current map settings button
 .
. - On the Mapping Profile tab, choose Default profile or Legacy profile.
Note:
To change the mapping profile for all new mapboards, click Application Settings to open the Settings window.
- Click OK to apply the change to your map.
When you sync your map, the downloaded results can vary depending on which setting you choose. The results from the new Default mapping profile are similar to the results of opening an .aix file exported from ArcGIS Pro because it also uses the latest technology.
Change the map projection
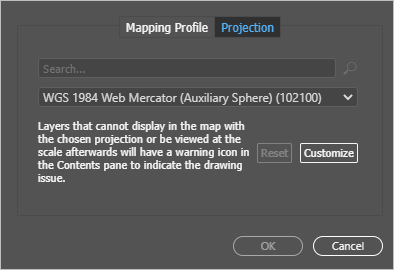
When you add layers in the Compilation window, they are projected on the fly if they don't match the projection of the map. (The only time a map projection changes to match that of the layers is if you choose to use the data's projection when you create a mapboard from a layer or shapefile.) In the Current Map Settings window, you can customize your projection by searching for or choosing a projection from the Projection menu.
You can use a different projection in the map as long as it's compatible with the original projection. If a layer is not compatible, it will not be included in the map; instead, an error message appears letting you know the layer is not compatible.
To change the projection, complete the following steps:
Note:
For ArcGIS Enterprise accounts, see the associated configuration requirements.
- In the Compilation window, click the Current map settings button
 .
. - On the Projection tab, choose a map projection from the menu, or type in the Search box to filter the projection list. You can search using the full or partial name of the projection or its well-known ID (WKID).

For a complete list of supported projections, see Coordinate system PDFs in the ArcGIS REST API documentation.
- Optionally, click Customize to modify your projection's coordinate system.
You can edit information such as the linear unit, the geographic coordinate system, and the datum.
- Click OK to apply the change.
The change takes effect immediately on the active mapboard and is also applied to the map in the downloaded output.
Note:
Layers won't display in the map if they cannot be projected to the chosen projection or if they cannot be viewed at the scale after projection. Raster data, including raster basemaps, tiled imagery layers, and WMTS layers cannot be reprojected.
To restore a projection to its original state, click Reset.
Note:
Once a mapboard is synced with a projection, its projection cannot be changed back for any subsequent sync operations.