Use the Mapboards window to do the following:
- Search for a location by using the Search button
 .
. - Pan the map by dragging the pointer, or change the scale or amount of detail that appears on the map by using the Zoom In
 and Zoom Out
  buttons.
 - Select an existing mapboard, including AIX-generated mapboards, for a corresponding file in Adobe Illustrator to compile more content that you can download and sync to its artwork layers.
- Create a mapboard. Mapboard options allow you to name the mapboard, change its dimensions (output size) and scale (level of detail), and specify geographic coordinates for a more precise map extent (area).
To create a mapboard, complete the following steps (or use an .aix file to generate mapboards automatically):
- In the Mapboards window, use one of the following methods:
- Click Import to use existing data for the map extent.
- Click Draw and manually draw an area for the map extent.
Note:
You can also click the Duplicate button
 on an existing mapboard to create a copy. Duplicating a mapboard is especially useful when you need to modify a locked mapboard after you sync the corresponding map.
 - Change mapboard properties, including the name and media size, map scale, or map extent. (AIX-generated mapboards are locked when they're created and cannot be modified.)
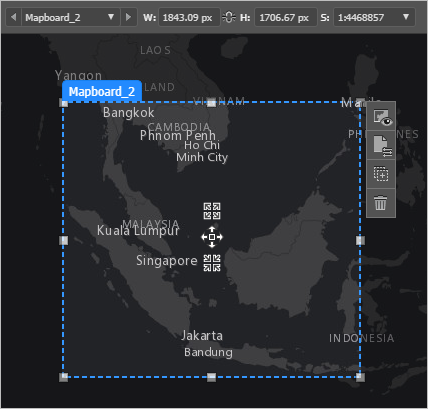
While editing is enabled, you can also drag the mapboard name tab to reposition the map extent or adjust the extent and scale using the handles on the edges and corners. Or you can change the size and scale by setting the values on the toolbar.

Tip:
For a greater level of precision, you can move and increase or decrease the geographic area covered by the mapboard (change the scale or level of detail) by using the move and continuous scaling buttons that appear in the center of the mapboard.
- Once you're satisfied with the mapboard, click the Preview button
 to preview and compile your map by adding more content.
 You can return to the Mapboards window to make adjustments as you work. The mapboard is locked after you sync the corresponding map to download artwork layers.
If you need to change a mapboard after downloading the map or opening an AIX file, click the Duplicate button
 on the mapboard tools and update the new mapboard. Duplicating a mapboard copies its properties and the compiled map, and allows you to edit map scale, dimensions, geographic extent, projection, and image resolution (PPI).
Import
To create a mapboard based on an existing layer, web map, or file, complete the following steps:
Note:
To create a mapboard for an .aix file, open the file in Adobe Illustrator to generate mapboards automatically. (Mapboards are only created for .aix files exported from ArcGIS Pro 2.6 or later. You cannot modify the properties for AIX-generated mapboards.) For more information, see Use .aix files.
- In the Mapboards window, click Import and choose one of the following data types:

- Layer—Also called web layers, these are logical collections of geographic data that are used to create maps.
- Web map—An interactive display of geographic information that contains a basemap, a set of layers (which might be styled using smart mapping), and an extent.
- File—A collection of geographic data stored in the following supported formats:
- Comma separated values file (.csv)
- Text file (.txt)
- GeoJSON (.geojson or .json)
- GPS exchange format file (.gpx)
- Shapefile (as a compressed zipped file [.zip])
- Ensure that all the components related to the shapefile are zipped into a single .zip file. If the .zip file is missing any component of the shapefile, such as the .shp, .shx, or .prj file, an error will be generated.
- KML/KMZ (XML-based file format)
- For the KML file format, some layers may take longer to download than others.
Note:
- There is a 2 MB file size limit for shapefiles and a 10 MB size limit for GeoJSON and KML. (If your account has the necessary privileges, you can publish shapefiles or publish GeoJSON files as hosted feature layers when they exceed the size limit.)
- Ensure that the number of records in shapefile, GeoJSON, CSV, and TXT file formats does not exceed 4,000; otherwise, an error will be generated. Shapefiles and GeoJSON files should have fewer than 4,000 point features or 2,000 line or polygon features.
- CSV and TXT file formats support a number of field configurations to geocode addresses and places.
- Geocoding consumes credits (except for ArcGIS Enterprise accounts when the portal is not using ArcGIS World Geocoding Service).
- Find the content or data to use, and click the Add button
 or click Open if you're adding from a file.
A mapboard is generated using the extent and name of the content or data that you added, and corresponding layers are added to the Compilation window. If the projection differs from the mapboard's default of Web Mercator, you'll be prompted to confirm which projection to use. (If you also opt to remember your choice here, it's saved in the extension's settings, where you can change your preference later.)
- Optionally, click the Modify map and output properties button
 to change mapboard properties, including the name and media size, map scale, or bounding coordinates.
Draw
To create a mapboard by manually drawing an area for the map's extent, complete the following steps:
- In the Mapboards window, click Draw to enable editing.

Note:
Panning actions are disabled when drawing is enabled. You can reenable map navigation by clicking Draw to turn drawing off or by using the keyboard shortcuts, such as pressing the Spacebar to pan the map.
- Drag to draw a box around the location you want to map.
Tip:
Use the Search button
 to find a location and zoom the map to an area of interest. If necessary, click the Select Basemap button
  to change the basemap for more context.
 - In the Mapboard Options window that appears, specify mapboard properties, including the name and media size, map scale, or bounding coordinates.
- Click OK.
Change mapboard options
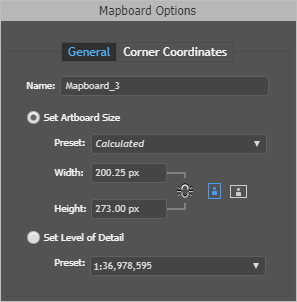
Use the Mapboard Options window to name the mapboard, change its dimensions (output size) and scale (level of detail), and specify geographic coordinates for a more precise map extent (area).
- In the Mapboards window, if necessary, select a mapboard and click the Modify map and output properties button
 .
.Tip:
If you have multiple mapboards, you can select and zoom to a specific mapboard by using the navigation menu in the toolbar at the top of the Mapboards window.

The Mapboard Options window appears.

Note:
AIX-generated mapboards are locked when they're created and cannot be modified.
- In the Mapboard Options window, on the General tab, change the default name of your mapboard.
- Define the map dimensions or the scale using one of the following options:
Note:
If you specify the dimensions, the scale is calculated for you based on the map extent. If you choose a scale, the dimensions are calculated for you. For more information, see Map concepts.
- Set Artboard Size—Explicitly set the output size (artboard), and allow the geographic extent and scale to adjust to fit.
In this workflow, you've determined that the output size is the most critical variable that you need to control. This is the case when a map must fit into a defined layout with a fixed-size column or frame.
- Preset—The calculated page size is determined based on the size of the box drawn over the map. To make the dimensions of the box adhere to standard sizes, choose from the list of defined preset sizes or explicitly set the required size.
Note:
Choosing from a list of preset page dimensions snaps the area to the preset properties. When you do this, the scale and extent change to adapt to the new settings.
- Width—The measurement from side to side
- Height—The measurement from base to top
Note:
You can constrain the width and height together. This allows you to define one, and the other is automatically calculated. You can also switch the width and height values using the portrait and landscape buttons.
- Preset—The calculated page size is determined based on the size of the box drawn over the map. To make the dimensions of the box adhere to standard sizes, choose from the list of defined preset sizes or explicitly set the required size.
- Set Level of Detail—Explicitly set the map's scale (level of detail or zoom level), and allow the geographic extent and output size (artboard) to adjust to fit.
In this workflow, you've determined that the map's detail is the most critical variable that you need to control. This is the case when a map must show a particular set of features with the details displayed in the Compilation window. With this option, you can change the extent and update the artboard size (width and height) and the level of detail on the map remains unchanged.
- Set Artboard Size—Explicitly set the output size (artboard), and allow the geographic extent and scale to adjust to fit.
- Optionally, click the Corner Coordinates tab to specify a more precise map extent by entering geographic coordinates for any of the mapboard's four corners. Explicitly setting the coordinates will recalculate the output size (artboard) to fit the new extent.
- Click OK.